
This Post is in tandem with a Live Video Presentation. If you are confused, or it seems like information is missing, please watch the video (Link Here). This is not intended to be a tutorial by itself.
This presentation is all about utilizing the functionality of Tiled Map Editor to create 2D maps & Interactive objects for your games. Godot’s tile maps are awesome but they are lacking the finesse for a more speedy workflow. Tiled offers you a much more refined workflow that results in quicker iterations and easier adjustments to your world. We’ll discover how Tiled can be advantageous in your projects, and show you how powerful it can be when it comes to realizing the game world you have dreamt of.
Why Tiled?
First of all, it’s a free tool. There is no purchase necessary.
But beyond that, there are many advantages to adding Tiled to your Godot workflow. Whether you are a solo dev, or have a team. Tiled is a very simple program to learn, and does not require a large investment of time to feel comfortable in. There are also a handful of very useful video tutorials out there. And though all of the things Tiled can do can be done within Godot, it is because Tiled is designed to be focused on Level Editing that makes a big difference to efficiency. The UI is the biggest difference. The way it handles tilesets in itself is a much more intuitive structure. Where Godot breaks things into separate tiles, you can see whole tilesets, and have a much more manageable workspace. It also handles layering in a much more simple manner. Rather than having numerous scenes, adding tilemap nodes and object nodes etc. etc. That can all be handled with clicks of a button. Not much different to an Image Editor like Photoshop or GIMP. If you are working with a team who is not natively experienced with the Godot program, this can be a huge advantage to any non-dev people working on your projects.
At the very basic use of Tiled, all that is required from a Godot standpoint is the Tiled Map Importer Plugin from George Marques:

This will automatically import tmx / tsx file extensions into your project. From there you could convert these into workable scenes and edit from Godot. This still may require quite a bit of finesse and not feel as efficient. But Tiled has a secret weapon when it comes to this. It utilizes what it calls meta data. In other words, it has the ability to retain data that can then be loaded into Godot. Joseph Lesko developed a very simple Tool Script to pull in this data automatically:
Tool
extends Node
var scene

const default_meta = ["gid", "height", "width", "imageheight", "imagewidth", "path"]

func post_import(imported_scene):
	scene = imported_scene

	for child in scene.get_children():
		if child is TileMap:
			import_tilemap(child)
		elif child is Node2D:
			for object in child.get_children():
				spawn_object(object)
			child.free()

	return scene

func import_tilemap(tilemap):
	pass

func spawn_object(object):
	if object.has_meta("path"):
		var path = object.get_meta("path")
		var node = load(path).instance()
		scene.add_child(node)
		node.set_owner(scene)
		node.position = object.position + Vector2(0,0)

		for meta in object.get_meta_list():
			if meta in default_meta:
				continue
			node.set(meta, object.get_meta(meta))
	else:
		object.get_parent().remove_child(object)
		scene.add_child(object)
		object.set_owner(scene)

func set_properties(object, node):
	for meta in object.get_meta_list():
		if meta in default_meta:
			continue
		node.set(meta, object.get_meta(meta))
To summarize, this essentially just takes the information known as meta data and converts them to nodes in the very positions that they were placed within the map. This is the most basic version of his code. We have expanded upon this quite extensively in our project TetraForce. I welcome you to visit our GitHub and see how scalable this can be. TetraForce is the best example of just some of the uses we’ve accomplished with Tiled. Everything from cuttable grass tiles, to animated water. Some other examples are: Monster Placement, Item Placement, NPC placement, Map Transitions, Camera Zones & more. It automatically recognizes all of these things. Once the Plugin imports the map, there is nothing more you have to do with that map scene. This code is called by placing it into the Import tab, under the Post Import Script:

By having this Tool script in place, you can now start to manipulate what certain tiles can do, and in what situation.
In this presentation we will be focusing on the spawn_object function. This takes all of your objects and places them in the world you’ve created. As you can see, it’s looking for the meta “path” – which is set in your tiles custom properties. It will then add that path as a child to your scene. After that it will look for further meta information that is above and beyond the default meta that is used in every object, noted in the Constant Dictionary (At the top of the Tool Script).
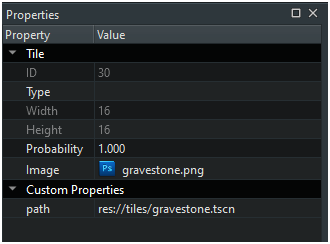 At its root, this object needs the Godot path to root any basic behaviors of that object. Even if it’s just an animation. So you will first create your object in Godot before adding it to an Object Tileset so that you can link it to it’s appropriate path. From there, in your actual map you will have an object layer- this is a special layer that recognizes these as objects in your world.
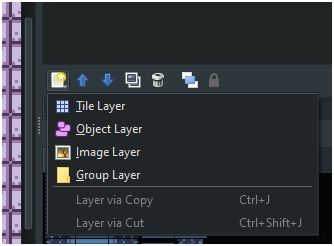
From there, you can start adding objects into your map, move them around as you please.
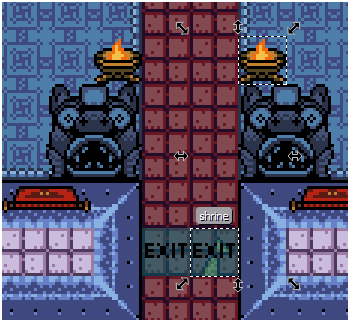
Again, this is the absolute most simple example of what you can do with Tiled. Tetraforce also uses Tilemap replacements, which we have used to create Interactive Grass and Animated Water. We have also used it to create zones which clamps the camera from going beyond what you want the player to see. So with some creativity, Tiled can handle a lot of your map creating needs, and once a base engine is in place you can focus on making your game.
Resources:
- About Post Import in Godot-
https://docs.godotengine.org/en/stable/classes/class_editorscenepostimport.html - Tiled Import Plugin GitHub-
https://github.com/vnen/godot-tiled-importer - Tiled-
https://www.mapeditor.org/